Have you ever heard about virtualization? Do you know how it works under the hood?
If it’s not the case or if you want to refresh your knowledge, let’s do it!
All the logic will be extracted in a JS class, so that you can use it in your favorite library. At the end, I do it with React.
What is virtualization?
Virtualization is the fact to put in the DOM only elements that are displayed on the user screen. In reality, there are some elements before and after to have a smooth scroll.
Why do we do that? If you put too many elements in the DOM you can have some performance issues and a bad user experience due to:
- a lot of DOM nodes in memory
- style calculation and paint cost
Who uses that? This is a technique that is really used in the industry, often in combination with infinite scroll. For example sites like Twitter, Instagram or Reddit use it.
Items with fixed height
For the first article we are going to do virtualization with items having the same height.
Before, going “deep” in the implementation, it’s important to understand the strategy we gonna have.
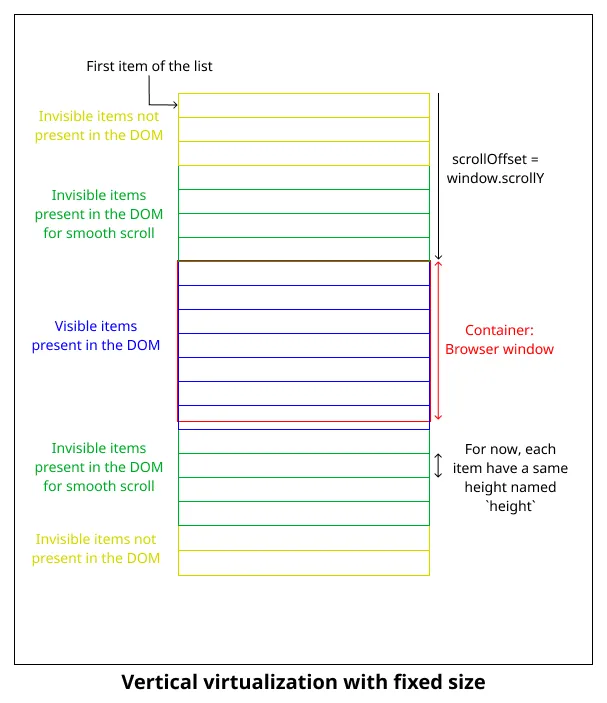
As you can see in the image, there are multiple things to understand:
- container: it’s the element that will contain the list.
- visible items: they are the items that are currently visible to the user. They are in blue in the image.
- invisible items present in the DOM: they are extra items that are currently not visible to the user, but are present on the DOM to have a smooth scroll.
- invisible items: they are items that are in the list but not present in the DOM. They will be in the DOM if they are in the range of items to put in the DOM, because they are in the two previous categories, when scrolling.
Get first and last index
Let’s do some Maths, simple one don’t be afraid, to calculate the first visible item index:
// Rounding down if the first item is half displayed
// for example
const firstVisibleIndex = Math.floor(
  scrollOffset / itemSize,
);
You see, nothing complicated. Let’s do the same thing to get the last index:
// Rounding down if the last item is half displayed
// for example
const lastVisibleIndex = Math.floor(
  (scrollOffset + window.height) / itemSize,
);
Extra items
Now let’s talk about extra items. As seen previously, most of the time we will add extra items before and after the displayed ones. It will improve the smoothness of the scroll and not display big white screen when scrolling fast.
So the first index of present element is:
// We do not want to have negative index
// So let's take the max of the calculation and 0
const firstPresentIndex = Math.max(
  firstVisibleIndex - extraItems,
  0,
);
And the last index of present element is:
// We do not want to have an index superior to
// the maximum item number
// So let's take the min of the calculation and `itemNumber`
const lastPresentIndex = Math.min(
  lastVisibleIndex + extraItems,
  itemNumber,
);
Positioning of items
We will need to place the items that are presents manually in the list element. The solution that I chose is to set the list element with position: relative and the items with position: absolute.
If you are not used to relative / absolute positioning, here is a little image to explain it:
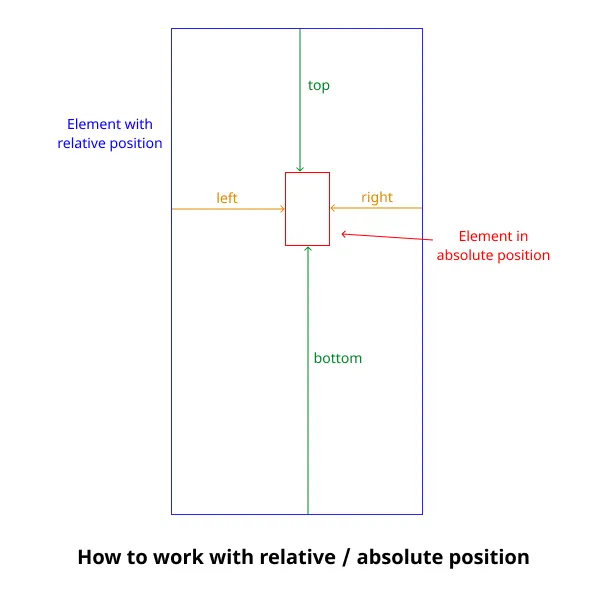
For our virtualization, the items which are in absolute position, are positioned relatively to the list element (which have relative position) thanks to top or left css properties in function of the list layout.
Then the list will scroll inside the container thanks to overflow: auto.
The first thing to do is to set the list style:
const getListStyle = () => {
  const listSize = this.itemNumber * this.itemSize;

  if (this.isVerticalLayout()) {
    // When dealing with vertical layout
    // it's the height that we configure
    return {
      height: listSize,
      position: 'relative',
    };
  }

  // Otherwise it's the width
  return {
    width: listSize,
    position: 'relative',
  };
};
And now let’s do a method to get an item style by its index:
const getItemStyle = (itemIndex) => {
  const itemPosition = itemIndex * this.itemSize;

  if (this.isVerticalLayout()) {
    // When dealing with vertical layout
    // the item is positioned with the
    // `top` property
    return {
      height: this.itemSize,
      width: '100%',
      position: 'absolute',
      top: itemPosition,
    };
  }

  // Otherwise with the `left` property
  return {
    height: '100%',
    width: this.itemSize,
    position: 'absolute',
    left: itemPosition,
  };
};
Full implementation in a class
Let’s implement all that we have seen previously in an FixedVirtualization class:
class FixedVirtualization {
  constructor({
    containerHeight,
    containerWidth,
    itemNumber,
    itemSize,
    extraItems,
    layout,
  }) {
    this.containerHeight = containerHeight;
    this.containerWidth = containerWidth;
    this.itemNumber = itemNumber;
    this.itemSize = itemSize;
    this.extraItems = extraItems;
    this.layout = layout;
  }

  isVerticalLayout = () => {
    return this.layout === 'vertical';
  };

  getListStyle = () => {
    const listSize = this.itemNumber * this.itemSize;

    if (this.isVerticalLayout()) {
      // When dealing with vertical layout
      // it's the height that we configure
      return {
        height: listSize,
        position: 'relative',
      };
    }

    // Otherwise it's the width
    return {
      width: listSize,
      position: 'relative',
    };
  };

  getItemStyle = (itemIndex) => {
    const itemPosition = itemIndex * this.itemSize;

    if (this.isVerticalLayout()) {
      // When dealing with vertical layout
      // the item is positioned with the
      // `top` property
      return {
        height: this.itemSize,
        width: '100%',
        position: 'absolute',
        top: itemPosition,
      };
    }

    // Otherwise with the `left` property
    return {
      height: '100%',
      width: this.itemSize,
      position: 'absolute',
      left: itemPosition,
    };
  };

  getFirstItemIndex = (scrollOffset) => {
    return Math.max(
      Math.floor(scrollOffset / this.itemSize) -
        this.extraItems,
      0,
    );
  };

  getLastItemIndex = (scrollOffset) => {
    return Math.min(
      Math.floor(
        (scrollOffset + this.containerHeight) /
          this.itemSize,
      ) + this.extraItems,
      this.itemNumber,
    );
  };
}
And here we go! Only one more step before we have something fully functional.
Detects scroll
Now, we need to watch when the user is scrolling inside the container.
Let’s simply add a listener on the scroll event of our container element:
// Just register an event listener on `scroll` event
// In React will be done inside a `useEffect` or
// directly with an `onScroll` prop
const onScroll = () => {
  // Update a state or retrigger rendering of items
  // In React will be done with a `useState` to set the offset
};
container.addEventListener('scroll', onScroll);

// You will probably have to add a `removeEventListener`
Let’s play
Now that we have the logic of virtualization extracted in FixedVirtualization and know that we need to re-render our items when scrolling in the container element, let’s do it in React.
The API that I decided to do, is to expose a List component with the following props:
layout: the layout of our list,verticalorhorizontal. By defaultverticalcontainerHeight: the height of the containercontainerWidth: the width of the containeritemNumber: the number of items that is in the listitemSize: the size of an item. The height for vertical layout, otherwise the item width.renderItem: a callback to render an item. The index of the item and the style to spread on the item will be passed as parameters.
This is how you will use it:
function App() {
  return (
    <List
      containerHeight={400}
      containerWidth={600}
      itemNumber={1000}
      itemHeight={50}
      renderItem={({ index, style }) => (
        <div
          key={index}
          style={{
            ...style,
            // Just put a border to see each item
            border: '1px solid black',
          }}
        >
          {index}
        </div>
      )}
    />
  );
}
And here is the implementation of the List component:
function List({
  renderItem,
  containerHeight,
  containerWidth,
  itemNumber,
  itemSize,
  layout = 'vertical',
}) {
  const [fixedVirtualization] = useState(
    () =>
      new FixedVirtualization({
        containerHeight,
        itemNumber,
        itemSize,
        extraItems: 10,
        layout,
      }),
  );
  // We put the offset in a state
  // And get the right items to display at each render
  // and their styles
  const [scrollOffset, setScrollOffset] = useState(0);

  const firstIndex =
    fixedVirtualization.getFirstItemIndex(scrollOffset);
  const lastIndex =
    fixedVirtualization.getLastItemIndex(scrollOffset);

  // Let's create an array of the items
  // which are present in the DOM
  const items = [];
  for (
    let index = firstIndex;
    index <= lastIndex;
    index++
  ) {
    items.push(
      renderItem({
        index,
        style: fixedVirtualization.getItemStyle(index),
      }),
    );
  }

  // Let's create an `onScroll` callback
  // We `useCallback` it only to have a stable ref for
  // the throttling which is for performance reasons
  const onScroll = useCallback(
    throttle(250, (e) => {
      const { scrollTop, scrollLeft } = e.target;
      setScrollOffset(
        layout === 'vertical' ? scrollTop : scrollLeft,
      );
    }),
    [],
  );

  return (
    <div
      style={{
        height: containerHeight,
        width: containerWidth,
        overflow: 'auto',
      }}
      onScroll={onScroll}
    >
      <div style={fixedVirtualization.getListStyle()}>
        {items}
      </div>
    </div>
  );
}
Conclusion
You can play with the complete code with this sandbox:
In a following article, you will see how to manage when we have items with different height.
Thanks for reading
You can find me on Twitter if you want to comment this post or just contact me. Feel free to buy me a coffee if you like the content and encourage me.