Have you ever wanted to do some animations in your application but didn’t know how to do it?
In this article we are going to see how to throw particles at click, like in the gif below:

Element.animate API
To animate a DOM element, we have to call the function animate. The function signature is:
domElement.animate(keyframes, options);
The keyframes are the parts of the animation. If you pass an array with a single Element, the initial position will be the actual position of the element. Otherwise it will be the first value in the keyframes array.
The options can be an integer that represents the duration of the animation or an object with multiple properties:
duration: the duration of the animationiterations: the number of iteration of the animation (Infinity for an endless animation)delay: to put some delay to the animation- …
Infinity square
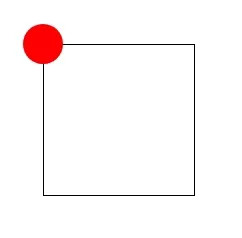
In this part, we are going to make a circle move on a square:
- point 1: the initial point
- point 2: translation by the axe y from the point 1
- point 3: translation by the axes x and y from the point 1
- point 4: translation by the axe x from the point 1
We finally get the code:
// Let's get our circle element
const circle = document.getElementById('circle');

// Knowing the square 150px sides
circle.animate(
  [
    {}, // The initial position is the current one
    {
      transform: 'translateY(150px)',
    },
    {
      transform: 'translate(150px, 150px)',
    },
    {
      transform: 'translateX(150px)',
    },
    {}, // The final position is the current one
  ],
  { duration: 4000, iterations: Infinity },
);
We finally get the following animation:
Let’s code the click firework
Add element dynamically
For this example we will have to add element dynamically. Let’s create a div on click:
document.addEventListener('click', () => {
  const element = document.createElement('div');

  document.body.appendChild(element);
});
Now we want to put some style on this element, we are going to add some inline styles with element.style.myStyleProperty:
// A list of all possible colors
const COLORS = [
  'red',
  'blue',
  'green',
  'yellow',
  'pink',
  'purple',
];

document.addEventListener('click', (e) => {
  // Get the position of the cursor in the document
  const { clientX: x, clientY: y } = e;

  const element = document.createElement('div');
  element.style.width = '30px';
  element.style.height = '30px';
  element.style.border = '1px solid black';
  // The elements are in absolute position
  element.style.position = 'absolute';
  element.style.top = `${y}px`;
  element.style.left = `${x}px`;
  // We want our cursor to be centered in the square
  element.style.transform = 'translate(-50%, -50%)';
  // Get a color randomly
  element.style.backgroundColor =
    COLORS[Math.floor(Math.random() * COLORS.length)];

  document.body.appendChild(element);
});
Animation
Alright, currently we have a square that spawns under the mouse on click.
Let’s add some random diagonal animation to this square.
element.animate(
  [
    {
      // Math.random() - 0.5 returns integer between -0.5 and 0.5
      transform: `translate(${(Math.random() - 0.5) * 500}px, ${
        (Math.random() - 0.5) * 500
      }px) rotate(${Math.random() * 520}deg)`,
      // We want to reduce the opacity until 0
      opacity: 0,
    },
  ],
  1500,
);
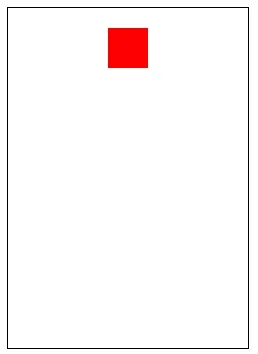
Nice, it’s working, but actually it’s not perfect, because the square stays visible at the end of the animation:

Actually, we could just change the initialization of the div and the animation to add the border and background-color during the animation.
element.animate(
  [
    {
      backgroundColor:
        COLORS[Math.floor(Math.random() * COLORS.length)],
      border: '1px solid black',
    },
    {
      // Math.random() - 0.5 returns integer between -0.5 and 0.5
      transform: `translate(${(Math.random() - 0.5) * 500}px, ${
        (Math.random() - 0.5) * 500
      }px) rotate(${Math.random() * 520}deg)`,
      // We want to reduce the opacity until 0
      opacity: 0,
    },
  ],
  1500,
);
Well, there is no more, display’s problem, but if you look at the DOM the div stays. It can be a problem when we are going to do the fireworks with a lot of div, at each click, DOM elements number will increase.
Luckily, domElement.animate returns an animation, on which we can get a Promise which is resolved when the animation is finished. Let’s just remove the dom element when the animation is ended:
animation.finished.then(() => createdElement.remove());
Firework
Now, let’s code the easy part: create multiple particles (with a loop):
// A list of all possible colors
const COLORS = [
  'red',
  'blue',
  'green',
  'yellow',
  'pink',
  'purple',
];
// Defines the particle number
const PARTICLES_NUMBER = 20;

function createParticle(x, y) {
  const element = document.createElement('div');
  element.style.width = '30px';
  element.style.height = '30px';
  element.style.border = '1px solid black';
  // The elements are in absolute position
  element.style.position = 'absolute';
  element.style.top = `${y}px`;
  element.style.left = `${x}px`;
  // We want our cursor to be centered in the square
  element.style.transform = 'translate(-50%, -50%)';
  // Get a color randomly
  element.style.backgroundColor =
    COLORS[Math.floor(Math.random() * COLORS.length)];

  const animation = element.animate(
    [
      {
        // Math.random() - 0.5 returns integer between -0.5 and 0.5
        transform: `translate(${(Math.random() - 0.5) * 500}px, ${
          (Math.random() - 0.5) * 500
        }px) rotate(${Math.random() * 520}deg)`,
        // We want to reduce the opacity until 0
        opacity: 0,
      },
    ],
    1500,
  );

  // Remove the particle at the end of animation
  animation.onfinish = () => element.remove();

  document.body.appendChild(element);
}

document.addEventListener('click', (e) => {
  // Get the position of the cursor in the document
  const { clientX: x, clientY: y } = e;

  // Create multiple particles
  for (let i = 0; i < PARTICLES_NUMBER; i++) {
    createParticle(x, y);
  }
});
Here we go :)
Conclusion
In this little article, we’ve just seen how to do basic animations in javascript, with a nice firework animation on click, but the power is unlimited.
Now it’s your turn to play with animations :D
Thanks for reading
You can find me on Twitter if you want to comment this post or just contact me. Feel free to buy me a coffee if you like the content and encourage me.